If you’re thinking about scaling your print on demand business, I’d start with a slightly unglamorous question: what do you have to do every time someone buys something?
Open an email? Copy an address? Send artwork to a printer, then check later that they got it?
A few minutes here and there might not feel like a big deal. And yeah, I’d also rather look at a new tote bag for the store than spend my afternoon chasing a tracking number. But those little jobs take up more of your day as orders increase. I’d sort them out before adding more to your plate.
Start with products people already buy, suppliers you can rely on, and a clear plan for which products go where. Then work out how orders and tracking will move between your store and suppliers. Test the whole process before you send more customers through it.
I’ll walk you through a checklist for getting ready to grow, including the slightly tricky bit where someone buys a T-shirt and a mug from two different suppliers.
What print on demand takes off your plate
Print on demand (POD) means a product is made after a customer orders it. You send the order and artwork to a supplier, who then prints the item and ships it to your customer.
You don’t have to buy 200 T-shirts upfront and hope they sell. You can try a design without committing to a large inventory order, and your garage gets to stay a garage.
That’s useful when you want to test mugs, hoodies, tote bags, wall art, or whatever else your supplier offers.
Be a little selective, though. Every new product brings sizes, artwork, product codes, delivery estimates, and customer questions to look at, even if you’re never packing a box yourself.
How to save time growing your POD business
1. Start with the products people are already buying
Before adding another 30 designs, look at what’s selling and how much work those orders create.
My first question would be whether a product sells consistently or had one very good week. My next would be how much money is left after production, shipping, selling fees, discounts, and marketing costs. A busy store can still leave you with very little to show for the work.
Then look at the questions customers keep asking. If people regularly need help choosing a size, fix the size guide before putting more money behind that T-shirt. That’s a useful improvement you can make without launching anything new.
When you do add products, follow what fits your audience. A gardening brand could try tote bags. A gaming community might prefer mouse pads or hoodies. For your own sake, resist the urge to put your logo on everything with a printable surface.
Add a small group of designs, give people a fair chance to find them, and use sales and feedback to decide what comes next.
2. Choose a POD supplier you can grow with
A good mockup can’t tell you how a print will look after one wash.
Order samples before building a collection around a product, and check again when you change products or suppliers.
I’d ask each supplier:
- Where will order ship from, and how long will they take to ship when things get busy?
- What happens if the size or color you sell most runs out?
- Can your store send orders straight to them, and will a tracking number be sent when an order ships?
- If an order gets stuck, who can you contact?
The support question deserves some extra attention.
Imagine finding a problem late on a Friday and realizing you don’t know who to contact. I’d want that answer saved somewhere before Friday arrives.
If you’re planning to keep a backup supplier, order their samples and check their product requirements now. Two products called “white cotton T-shirt” may have different fits, print areas, and product codes. You don’t want to find that out from a customer’s photo.
3. Decide how each order gets to the right supplier
If you have one store and one supplier, a direct connection may do the job. Check which order details it sends and whether tracking comes back to your store. If it covers your workflow, you can keep it simple.
A second supplier changes the plan.
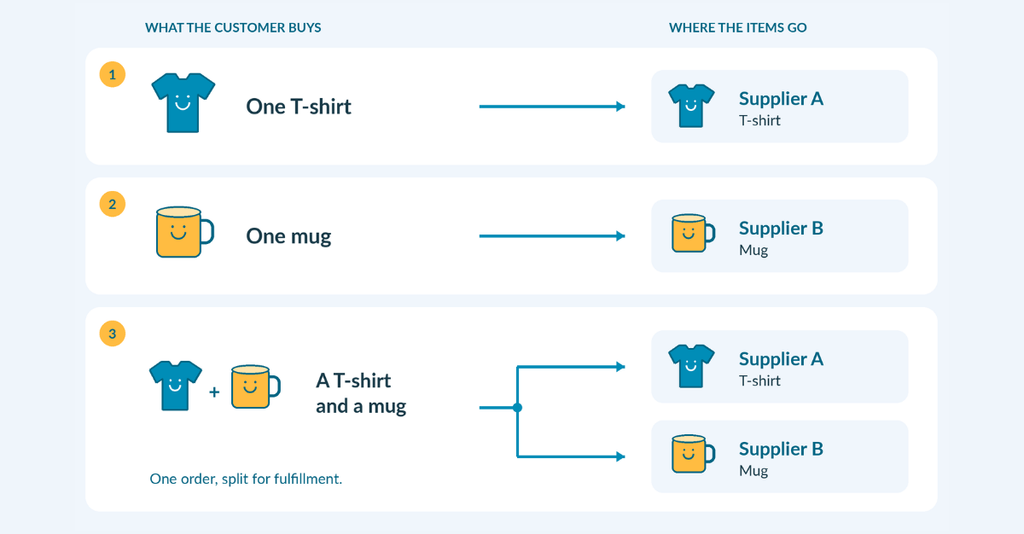
Say Supplier A prints your T-shirts and Supplier B makes your mugs. Someone buys both in one checkout. Does each supplier receive only its own item? And what will the customer see when the two packages ship at different times?
Write down which supplier gets each product. Include the product codes and artwork files each one needs. That gives you something specific to set up and test.
Read our print on demand fulfillment guide on how to bring orders in, add stored print details, split items by their assigned print location, and submit the orders to the right printers.
Atelier Printworks is a great real-world example! They sell through Shopify and Etsy and use rules based on product and destination to send orders and artwork to three main print partners. Tracking then goes back to the sales channel. Their team knew how they wanted to make those decisions before turning them into rules.
4. Test a mixed order before your customers do
I’d test the T-shirt-and-mug order before promoting the new range. One successful T-shirt order tells you that the T-shirt route works. The mixed order checks what happens when both suppliers are involved.
Follow it through from checkout to shipment and confirm that:
- Each supplier receives only the item they’re meant to fulfill.
- The size or other product option, supplier product code, and artwork are right.
- Neither supplier receives the same item twice.
- Each shipment’s tracking reaches the right order in your sales channel, if that connection supports it.
- Your customer emails make it clear that the items may arrive separately.
Check the documentation for your specific integrations before relying on tracking updates are supported. For example, Cloudprinter’s Order Desk integration sends shipment information back to Order Desk and the original cart, but you should confirm the behavior and settings for your supplier and sales channel.
If you’re replacing a direct supplier connection, check whether the old route is still active before enabling the new one.
5. Decide who checks orders that get stuck
Choose who and when to check orders that haven’t moved forward and where you’ll keep track of what needs attention. “I’ll remember to look later” could backfire, especially during a busy week.
If you use Order Desk, the Order History on an order shows whether a submission was scheduled, succeeded, or failed. A failed submission includes a message you can use to investigate. Missing or incorrect print details are one possible cause.
If you’re unsure whether a supplier received an order, check its status with them before retrying. Then look for patterns. If several orders are missing the same product detail, fix that detail where it’s stored instead of correcting every order separately. The future version of yourself will thank you.
6. Tell customers what to expect from separate shipments
Put yourself on the receiving end of that T-shirt-and-mug order.
The mug arrives, but there’s no T-shirt in the box, and nobody has said another package is coming. Your customer will have questions about it.
Put realistic production and delivery estimates on your product pages. Tell customers when items may arrive separately, then read the emails they’ll get when only part of an order ships.
Would you know what’s still on the way?
7. Make it easy for customers to get help
Before writing your return policy, ask each supplier how they handle damaged items, incorrect products, and other requests. Tell customers how to contact you and what details or photos you’ll need from them.
There’s room for your brand’s personality in those messages. You can write a useful follow-up, invite customers to share photos, or ask your supplier about branded packing slips. I’d get the delivery explanation right first. Then have fun with the extras. For more customer-facing ideas, see our five ways to grow your POD business for free.
Start with one order
Pick a recent order and retrace what you did between the sale and the shipping update. Where did you copy information, open another dashboard, or step in to fix something?
I’d choose the task you’re most tired of repeating and start there.
If you’re sending items to different printers by hand, use the print-on-demand fulfillment walkthrough to map the route, then test it with a small mixed order before applying it more widely.
If you’re sending items to different printers by hand, try Order Desk free for 30 days!